Bike 100-Mile Ride: A Complete Beginner’s Guide
Renting a bike for a 100-mile ride is simple. Get tips on choosing the right rental, ensuring a perfect fit, and preparing for your bike 100-mile ride.
You’ve committed to the training and started fundraising. Your energy should be spent connecting with teammates and supporting our local autism partners, not worrying about bike logistics. So, what about the bike? If you’re wondering, can you rent a bike for a 100-mile ride?, the answer is a definite yes! Renting locally at your destination is a game-changer. It eliminates travel hassles and ensures a great bike is ready and waiting for you. This guide will show you how simple the process is, so you can focus on what truly matters: the ride and the reason we pedal.
Key Takeaways
- Book Early and Ask Smart Questions: Secure the right bike by contacting local shops well in advance. Ask about their performance models, maintenance schedules, and rental terms to find a reliable partner for your ride.
- Prioritize a Comfortable Fit: A great ride starts with a great fit. Have the shop adjust the bike to your measurements, and bring your own saddle and pedals from home for a familiar, comfortable setup.
- Do a Final Pre-Ride Check: Before the event, give your rental a quick inspection. Check the tire pressure, brakes, and chain, then take a short test ride to confirm everything feels solid and ready to go.
What Is a Century Ride?
A century ride is a rite of passage in the cycling world—a 100-mile journey completed in a single day. It’s a benchmark that tests your physical endurance and mental grit, but more than that, it’s a powerful personal achievement. While the distance might sound intimidating, it’s a goal that brings cyclists together, often for a shared purpose. Whether you’re riding for a personal best or for a cause close to your heart, completing a century is an unforgettable experience. It’s about pushing your limits, discovering new strengths, and celebrating the simple, profound joy of the ride.
A Brief History of the 100-Mile Ride
The concept of the century ride has been a staple in cycling for over a hundred years. At its core, a century ride is a bike ride that you complete in one day. However, the exact distance depends on where you are in the world. In the United States, a century means tackling 100 miles, which is about 161 kilometers. In countries that use the metric system, a century ride is 100 kilometers, which is roughly 62 miles. This 62-mile version is often called a “metric century” and serves as a fantastic stepping stone for cyclists working their way up to the full 100-mile challenge.
Common Types of Long-Distance Rides
The great thing about long-distance cycling is that it’s not one-size-fits-all. The term “century” has inspired a whole family of rides with varying lengths, making the sport accessible to everyone. You’ll often hear about a Quarter Century (25 miles) and a Half Century (50 miles), which are popular options for new riders or those with limited training time. At Bike to the Beach, we embrace this flexibility, offering multiple distance options for our rides in New England, New York, and beyond. This ensures that everyone in our community can participate, contribute, and experience the thrill of crossing the finish line.
The Classic Century and Double Century
The classic 100-mile century is the traditional gold standard. Many century rides are organized by local cycling clubs and serve as social events that help them raise money and build community. These rides are typically well-supported with rest stops and route markings, allowing riders to focus on pedaling. For those who want an even greater challenge, there’s the double century—a staggering 200-mile ride. These events demand serious training and a rock-solid nutrition and hydration plan, pushing riders to the absolute edge of their endurance.
Gran Fondos and Randonneuring
Beyond the classic century, you’ll find other organized long-distance events like Gran Fondos and Randonneuring. A Gran Fondo, which translates to “big ride” in Italian, is a mass-participation event that is often timed, adding a competitive element. Randonneuring is a non-competitive, ultra-endurance sport where riders must navigate a long course with checkpoints to ensure they complete the entire route. The shortest official randonneuring distance is a “double metric” century of 200 kilometers (125 miles), showcasing a different style of self-supported, long-distance cycling.
Multi-Day Tours and Charity Rides
Long-distance rides also form the backbone of multi-day tours and charity events. Some bike tours that last several days will include one or more century-length rides as part of their route. Charity rides, like Bike to the Beach, harness the energy of this personal challenge and channel it toward a greater good. When you ride with us, you’re not just covering miles; you’re raising critical funds and awareness for local autism and disability partners. It transforms the ride from a purely athletic pursuit into a powerful act of community support, which is why we bike.
Training for Your First 100-Mile Ride
Taking on your first 100-mile ride is a huge accomplishment, and it all starts with a smart training plan. The idea of pedaling for that long can feel overwhelming, but when you break it down, it’s an achievable goal for almost any cyclist. The key is consistency, not intensity. You don’t have to spend every weekend on an epic 8-hour ride to get ready. With a structured approach, you can build the strength and endurance you need without burning out, ensuring you arrive at the starting line feeling confident, prepared, and excited for the day ahead.
Building Your Fitness Base Like a Marathoner
Just like training for a marathon, preparing for a century ride happens in phases. Most training plans follow three main stages: a Base Phase, a Build Phase, and a Specialty Phase. The Base Phase is all about getting your body used to spending time on the bike with low-intensity rides. During the Build Phase, you’ll gradually increase the length and intensity of your workouts. Finally, the Specialty Phase involves tapering your effort before the event so your body is rested and ready. You might be surprised to learn that you don’t need to do super long training rides every week. Many cyclists can get ready for a century with structured workouts totaling just 3-4 hours per week.
Creating Your Training Schedule
Time is your best friend when it comes to training. To build a solid foundation, you should plan for at least 12 weeks of consistent training. This gives your body enough time to adapt and grow stronger without rushing the process. For the best results, a 28-week plan is often recommended, as it allows for a more gradual and thorough preparation. Start by scheduling two or three shorter rides during the week and one longer ride on the weekend. As you progress, slowly increase the distance of your long ride by about 10% each week to build endurance safely.
The Importance of Rest and Recovery
One of the most critical parts of any training plan is the part where you do nothing at all. Rest and recovery are when your body repairs muscle, builds strength, and recharges for the next workout. It’s essential to listen to your body and not over-train. If you feel constantly tired, sore, or unmotivated, it’s a sign that you need to take a break or reduce the intensity of your rides. Don’t be afraid to schedule rest days into your week—they are just as important as your training rides. Proper sleep, good nutrition, and active recovery (like stretching or a gentle walk) will ensure you get stronger and avoid injury.
Renting a Bike for a 100-Mile Ride? Here’s What to Know
Yes, you absolutely can, and it’s a great idea! Whether you’re a seasoned cyclist or taking on your first century, renting a bike can simplify your logistics and set you up for a fantastic ride day. With a little bit of planning, you can find the perfect bike to carry you across the finish line, letting you focus on the journey and the community you’re riding for.
The Perks of Renting for Your Century Ride
Renting a bike for a century ride is a smart and popular option, especially if you’re traveling for one of our destination events. Let’s be honest, shipping your own bike can be a logistical headache. Renting saves you the hassle and expense of packing and transporting your equipment, so you can focus on what really matters: preparing for an incredible day of cycling. Many local bike shops offer high-quality road bikes that are perfect for going the distance. It’s a simple way to ensure you have a reliable, well-maintained bike waiting for you when you arrive for your DC/MD/VA ride or any of our other locations.
How to Plan Your Bike Rental
A little planning goes a long way in making your rental experience smooth and successful. Start by calling local bike shops well in advance. Let them know you’re training for a 100-mile charity ride and ask about their performance road bikes and fitting services. If you can, try to arrive a day early to pick up your bike. This gives you plenty of time for a proper fitting and a short test ride to work out any kinks. A quick spin around the block can help you confirm the bike feels comfortable and ready for the big day. This preparation ensures your focus stays on the ride and why we bike for our community.
Choosing the Right Bike for Your 100-Mile Ride
Choosing the right bike for a 100-mile ride is a game-changer. The perfect bike isn’t about having the most expensive or fastest model; it’s about finding the one that feels right for you. Your comfort, riding style, and personal goals all play a role in this decision. Whether you prioritize speed, comfort, or a little extra help up the hills, there’s a great rental option waiting for you. Let’s look at the three most common types of bikes you’ll encounter so you can choose with confidence.
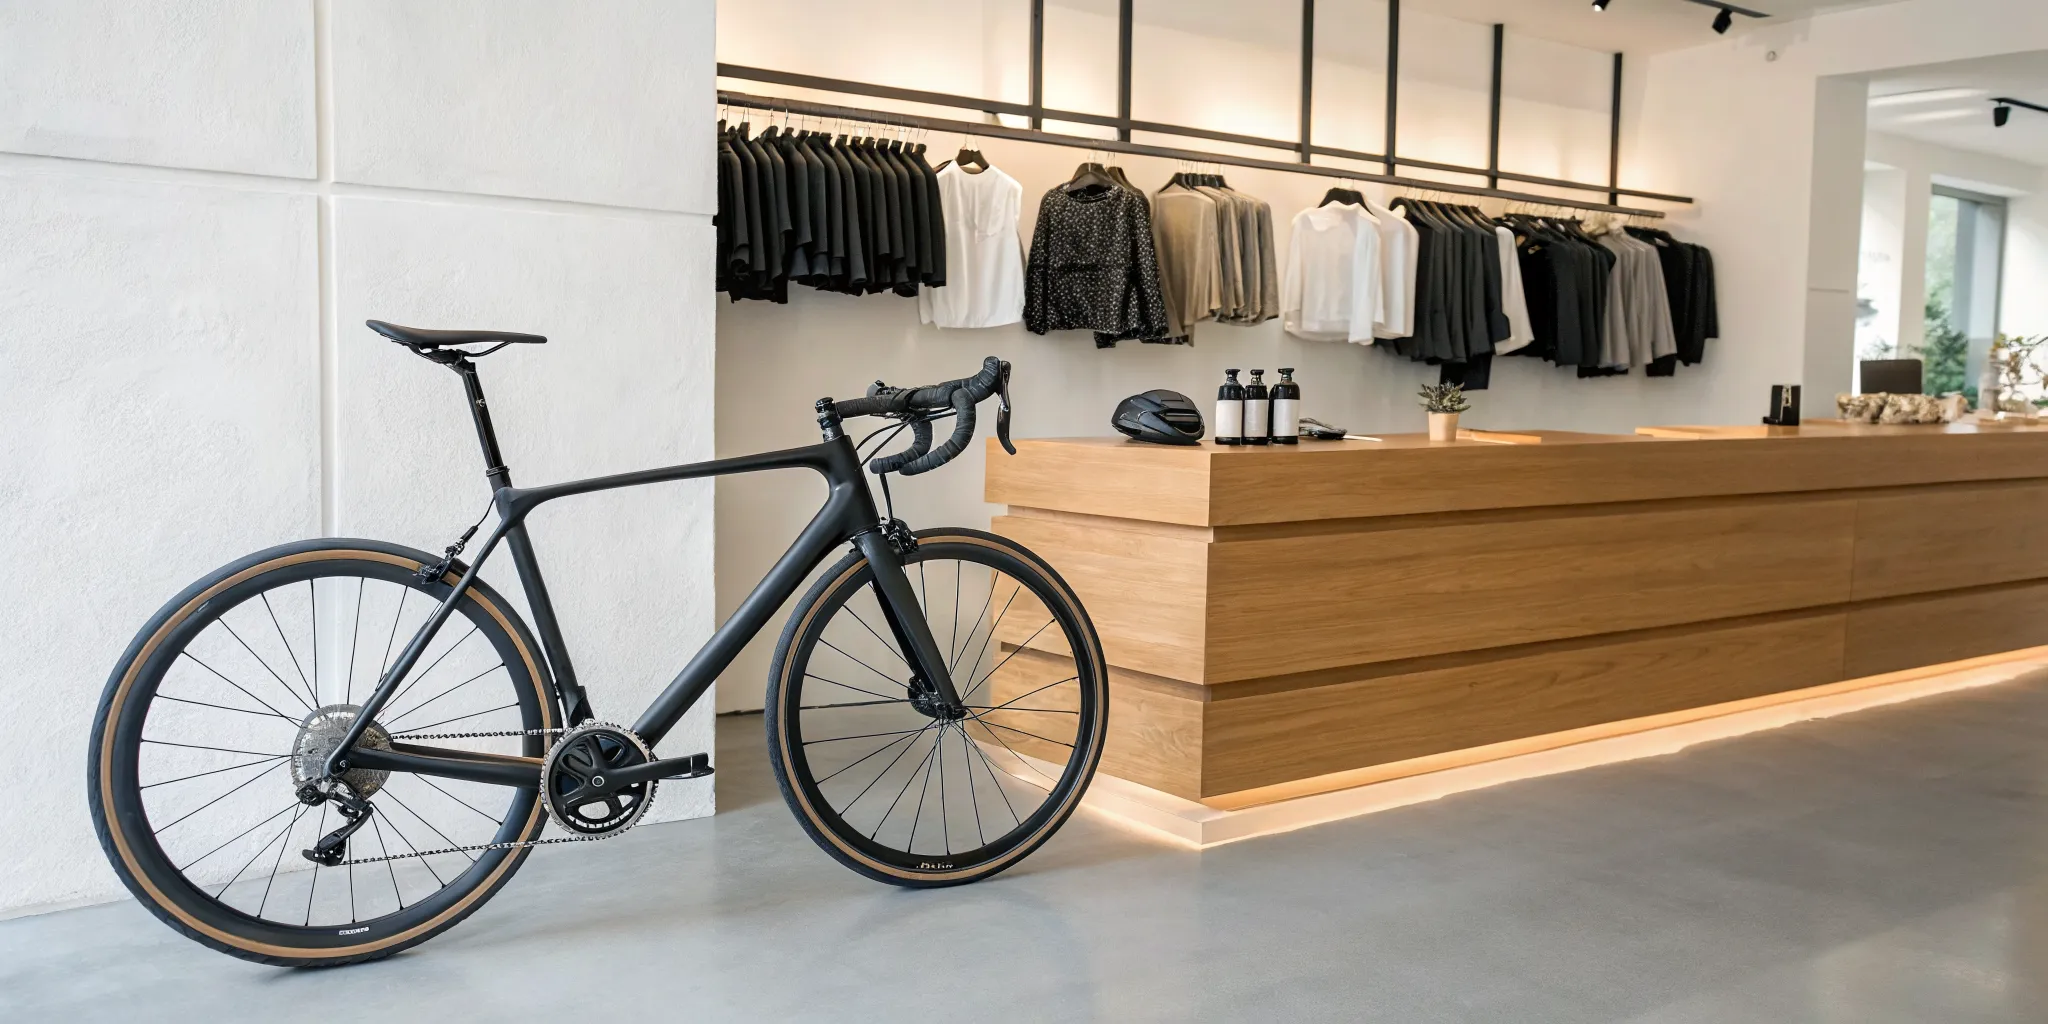
Road Bikes: Built for Speed and Distance
If you want to cover ground efficiently, a road bike is your best friend. Specifically, look for an endurance road bike, which is designed for long-distance comfort without giving up speed. These bikes feature a lightweight frame and a design that puts you in a slightly more upright position than a pure racing bike, taking pressure off your back and shoulders. They are built to feel smooth and stable on paved roads, making them an ideal choice for a century ride. If you’re comfortable with drop handlebars and want a bike that rewards your effort with performance, this is the way to go.
Hybrid & Touring Bikes: For a More Comfortable Ride
For riders who put comfort first, a hybrid or touring bike is an excellent choice. Think of these as the best of both worlds, combining features from road and mountain bikes. They have flat handlebars and a relaxed, upright riding position that’s easy on your body over many miles. The wider tires provide extra stability and a smoother ride, absorbing more bumps from the road. While not as fast as a road bike, their focus on comfort makes them perfect for enjoying the journey and arriving at the finish line feeling strong. They are a fantastic, confidence-inspiring option for new and experienced riders alike who want a dependable and comfortable ride.
E-Bikes: Get an Assist When You Need It
Want a little extra power in your pedals? An e-bike could be the perfect match. E-bikes are equipped with a small, quiet motor that provides a boost when you pedal, making hills feel flatter and headwinds less challenging. This isn’t about getting a free ride; it’s about getting assistance when you need it most, allowing you to conserve energy and ride farther with less fatigue. E-bikes are an incredible tool for making cycling more accessible, ensuring that anyone who wants to join our community ride can do so with confidence. They are a great way to tackle a long-distance ride and focus on the fun, not just the effort.
How to Get the Perfect Fit on a Rental Bike
Renting a bike for a long-distance event is a fantastic way to simplify your travel and logistics. But for a ride like one of our 100-mile Bike to the Beach events, a poor fit can turn an amazing day into a painful one. The right bike fit is about more than just comfort; it’s about efficiency and injury prevention. When your bike is adjusted correctly for your body, you can pedal more powerfully with less effort and finish the ride feeling strong, ready to celebrate with our community at the beach.
Think of a bike fit as setting yourself up for success. A few key adjustments can make the difference between struggling with knee pain or a sore back and cruising across the finish line with a smile. Don’t be shy about working with the rental shop to get it right. They are the experts, and their goal is to ensure you have a safe and enjoyable ride. Let them know the distance you’re tackling and that you need the bike to perform well for several hours. Taking a little extra time to dial in your fit before you leave the shop is one of the most important things you can do to prepare. It’s a small investment of time that pays huge dividends in comfort and performance on event day. This section will walk you through exactly how to get that perfect fit, from knowing your measurements to making the right adjustments at the shop.
Getting Your Bike Sizing Right
Getting the right frame size is the foundation of a good bike fit. While a shop can make small adjustments to components, they can’t change the size of the frame itself. Before you even contact a rental shop, try to get a handle on your basic measurements. The most important one is your standover height, which is the clearance you have over the bike’s top tube when standing flat-footed. You should have at least an inch of space. If you have a bike you love at home, write down its make, model, and size. You can also find online sizing charts that use your height and inseam to recommend a frame size. Having this information ready will help the rental shop find the perfect match for you from their fleet.
Fine-Tuning Your Fit at the Shop
Once you have the right-sized frame, it’s time to fine-tune the fit. Let the rental shop know you’re training for a century ride so they understand the importance of getting it just right. A good shop will help you make several key adjustments before you leave. First is saddle height; your leg should have a slight bend at the bottom of the pedal stroke to maximize power and protect your knees. Next, they’ll check the handlebar height and reach to ensure you aren’t too stretched out or cramped. A proper bike fit ensures your body is in a comfortable, powerful, and sustainable position for the long haul. Don’t leave until you feel confident in the setup.
Adjusting for Long-Distance Comfort
To make a rental bike truly feel like your own, bring a few key items from home. Your saddle and pedals are the two most important contact points on a bike, and using your own can make a world of difference in comfort. Most rental shops are happy to swap them onto the bike for you. A proper bike fit ensures your body is in a comfortable, powerful, and sustainable position for the long haul, which is exactly what you need for a successful century. Taking these extra steps helps you settle in and focus on the ride itself, letting you fully enjoy the scenery and camaraderie of a fully supported bike ride without being distracted by discomfort.
Understanding That Your Fit May Evolve
Your bike fit isn’t always a one-and-done deal. What feels perfect in the shop might need a tiny tweak at mile 50. As you ride, your body settles in, and you might notice a need for a minor adjustment to your saddle height or handlebar position. This is completely normal. It’s a great idea to carry a multi-tool with you to make these small changes on the fly. Remember, taking a little extra time to dial in your fit before you leave the shop is one of the most important things you can do to prepare. It’s a small investment of time that pays huge dividends in comfort and performance on event day, ensuring you feel great all the way to the finish line.
For a Better Ride, Bring Your Own Saddle and Pedals
Here’s a pro tip that can completely change your rental experience: bring your own contact points. Your body is used to your own saddle and pedals, and swapping them onto the rental bike provides instant familiarity and comfort. Saddles are incredibly personal, and the one that comes with a rental is unlikely to be the perfect match for you over 100 miles. The same goes for pedals; using your own allows you to wear your own comfortable and broken-in cycling shoes. Just pack your saddle, pedals, and shoes, and ask the shop to install them for you. Most shops are happy to do this. It’s a small step that makes a huge difference in preventing soreness and keeping you focused on the ride.
Decoding Bike Rental Costs and Agreements
Renting a bike for a century ride is a fantastic option, but the last thing you want are surprise costs or confusing policies. Getting clear on the rental agreement ahead of time lets you focus on your training and fundraising. Think of it as part of your ride prep, just like planning your nutrition or packing your gear. A little bit of research now ensures a smooth, stress-free experience, so you can enjoy every mile knowing all the details are handled. Let’s walk through what you need to know about the costs and terms before you commit.
How Much Does It Cost to Rent a Bike?
Rental prices can vary quite a bit, depending on the shop, the location, and the type of bike you choose. A high-performance carbon road bike will naturally cost more than a standard aluminum or hybrid model. Generally, you can expect to pay anywhere from $75 to $150 per day for a quality road bike suitable for a 100-mile journey. Many shops offer discounts for multi-day rentals, which is perfect if you’re traveling for a Bike to the Beach ride and want the bike for the whole weekend. Always ask if the price includes essentials like a helmet and pedals.
Watch Out for Deposits and Hidden Fees
Beyond the daily rental rate, it’s important to ask about any other potential charges. Most bike shops will require a security deposit, which is usually placed as a hold on a credit card. Be sure to ask what their policy is for damage. Do they have a damage waiver you can purchase for extra peace of mind? This small, optional fee can cover you for accidental scrapes or mechanical issues. Also, confirm the shop’s policy on late returns. Knowing these details upfront helps you budget accurately and avoids any unexpected charges after you’ve crossed the finish line.
Does Your Rental Include Insurance or Roadside Support?
When you’re miles from the start line, you want to know you have a backup plan. Ask the rental shop what happens if you get a flat tire or have a mechanical problem during your ride. Some shops offer roadside support within a certain radius, while others may not. Most rentals include a helmet and lock, but you should confirm if a flat repair kit is part of the package. Even if it is, it’s always a great idea to carry your own basic repair essentials, like a spare tube, tire levers, and a CO2 inflator or mini-pump. Being prepared lets you handle minor issues quickly and get back to riding.
What to Pack for Your 100-Mile Bike Ride
Once you’ve found your bike, the next step is making sure you have everything else you need for a safe and successful ride. Think of the bike as your foundation, and your gear, fuel, and personal items as the support system that will carry you to the finish line. A little preparation here goes a long way in keeping you comfortable, confident, and focused on the journey ahead. Let’s walk through the essentials to pack and plan for before you clip in.
Essential Safety Gear and a Basic Repair Kit
Your safety is the top priority on ride day. Thankfully, most rental shops agree and will provide the basics, including a properly fitted helmet and a bike lock. For road bike rentals specifically, it’s common for the shop to include a small repair kit with a spare tube, tire levers, and a CO2 inflator for quick fixes. However, never assume this is included. Always confirm with the shop what safety and repair equipment comes with your rental. It’s also a great idea to have your own essentials, like a favorite pair of cycling gloves or bright, visible Bike to the Beach apparel to wear on your ride.
Personal Items You Won’t Want to Forget
Over a 100-mile ride, small discomforts can become major issues. The best way to prevent this is by bringing your own “contact points” from home. These are the three places your body connects with the bike: your saddle, your pedals, and your shoes. Riding with a familiar saddle that you’ve already broken in can be a game-changer for your comfort. The same goes for your own pedals and cycling shoes, which ensure a proper fit and efficient power transfer. Most bike shops are happy to swap these items onto your rental bike for you, so don’t be shy about packing them.
Sunscreen and a Change of Clothes
Don’t underestimate the sun on a long ride. A painful sunburn can quickly turn your finish-line high into a miserable experience, and over a 100-mile ride, even small discomforts can become major issues. Be sure to apply a broad-spectrum, sweat-resistant sunscreen before you start, and pack a travel-sized bottle to reapply at rest stops. Just as important is bringing a change of clothes for after you cross the finish line. There’s no better feeling than swapping your cycling kit for something dry and comfortable, especially at our events. You’ll want to be ready to relax and celebrate at the beach with the community, fully enjoying the moment and reflecting on the incredible journey you just completed and why we bike together.
How to Plan Your On-Bike Fuel and Hydration
A century ride is as much an eating and drinking challenge as it is a cycling one. To avoid hitting the dreaded wall, you need a solid nutrition and hydration plan. A good rule of thumb is to consume 200-300 calories every hour after your first hour on the bike. It’s also critical to stay hydrated by drinking 16-24 ounces of fluid per hour. Use a combination of water and an electrolyte sports drink to replenish the sodium and minerals you lose through sweat. While all our Bike to the Beach rides have fully stocked rest stops, carrying your own preferred snacks and drinks ensures you always have the fuel you need, right when you need it.
What to Eat Before the Ride
Think of the days leading up to your ride as your fueling phase. To make sure your energy stores are topped off, focus on carbohydrate-rich foods like pasta, rice, and bagels for one to two days before the event. This process, often called carb-loading, is your secret weapon for endurance. The goal is to fill your muscles with glycogen, which is the fuel they’ll burn through during those 100 miles. Don’t overthink the science; just focus on incorporating healthy carbs into your meals. This simple step ensures you start the ride with a full tank, ready to pedal with power from the very first mile. It’s a crucial part of your preparation that helps you feel strong and capable on ride day.
Fueling and Hydrating During the Ride
On the day of the ride, the key is to eat and drink consistently, long before you feel hungry or thirsty. For a long event like a century, you should aim to consume fuel regularly. A great strategy is to set a timer on your watch or bike computer to remind you to take a sip or a bite every 20-30 minutes. Start with solid foods like bananas or even a savory bagel early in the ride to keep your energy steady. You can save sugary gels and chews for the later stages when you need a quick boost. While our Florida ride and other events have amazing, fully-stocked rest stops, carrying your own trusted snacks ensures you’re never caught without the fuel your body knows and likes.
Practicing Your Nutrition Strategy in Training
The golden rule of ride-day nutrition is simple: nothing new on race day. Your long training rides are the perfect opportunity to experiment with different foods, drinks, and snacks to see what your stomach can handle. Use these rides as a dress rehearsal for your century. Practice eating and drinking on the bike to figure out what works best for you, what’s easy to carry, and what gives you sustained energy without causing digestive issues. Nailing down your nutrition plan ahead of time builds confidence and eliminates one more thing to worry about. When you roll up to the start line, you’ll know exactly how to keep yourself fueled from start to finish.
How to Find the Right Rental Shop
Finding a great bike shop is about more than just getting a bike; it’s about finding a partner for your ride. The right shop will set you up for success with well-maintained equipment and expert advice, while the wrong one can leave you feeling stressed. Taking a little time to vet your options will give you peace of mind and a much better experience on event day. Think of it as the first step in your training plan. A reliable shop ensures your focus stays on the ride and the community you’re supporting, not on mechanical troubles.
How to Spot a Great (and Not-So-Great) Bike Shop
When you start your search, keep an eye out for signs that a shop is a great fit. Green flags include knowledgeable staff who are happy to answer your questions, transparent pricing, and a clear rental policy. A great shop wants to collaborate with you to ensure you have a safe and successful ride. This partnership is especially important for community events, where the goal is to provide supportive options like adaptive bike rentals for every participant. On the other hand, red flags include poor customer service, vague answers about bike maintenance, or an unwillingness to help you find the right fit. Trust your gut; if a shop feels off, it probably is.
Questions to Ask the Shop Before You Rent
Before you commit, arm yourself with a few key questions. This isn’t about being difficult; it’s about being prepared. Ask about the condition of their bikes, how often they perform maintenance, and what kind of support they offer during your rental period. Find out what’s included, like a helmet, lock, or flat kit. It’s also important to know their policy if you have a mechanical issue on the road. A responsive shop will be ready to assist with any special requirements you may have and can tell you how they handle a request for a reasonable accommodation. Their answers will tell you everything you need to know about their level of service.
Finding Adaptive and Accessible Bike Rentals
Our community is built on inclusivity, and your rental experience should reflect that. If you or a teammate needs an adaptive bike, be sure to confirm that the shop has accessible options. It can be challenging for riders with disabilities to find suitable rentals, as many traditional bike shops don’t carry adaptive bicycles in their fleet. To avoid any last-minute stress, call shops well in advance to ask about their inventory. If they don’t have what you need, they may be able to recommend a specialty shop that does. You can also find online resources that point you to where to rent adaptive bikes in your area.
Pacing and Mental Strategy for Success
A 100-mile ride is as much a mental game as it is a physical one. Your mindset and strategy on event day are just as important as the miles you put in during training. It’s not about being the fastest; it’s about being smart, steady, and supportive of the riders around you. The energy of the group, the purpose behind the ride, and a solid plan will carry you through the toughest miles. By focusing on a sustainable pace and consistent fueling, you can ensure you have the energy to not only cross the finish line but to truly enjoy the celebration at the beach with your community.
The key is to ride your own ride while drawing strength from the group. Remember that everyone out there is part of the same team, pedaling for the same reason. Let that collective energy motivate you, but listen to your own body. Pacing yourself early on is crucial—the adrenaline at the start line can tempt you to go out too fast, but reserving your energy will pay off in the final miles. A smart strategy allows you to soak in the experience, connect with fellow riders, and arrive at the finish feeling accomplished and strong, not just exhausted. Let’s break down how to manage your pace, mind, and fuel for a successful century.
Set a Realistic Goal: Finish Strong
There’s a huge difference between just finishing a century and finishing it strong. Your goal for the day shouldn’t be just to survive the 100 miles, but to cross the finish line feeling proud and capable. This starts with resisting the temptation to fly out of the gate. A century ride is a marathon, not a sprint. Find a comfortable, conversational pace that you can maintain for hours. A smart strategy, combined with the right bike fit and a solid nutrition plan, will make the end of the ride feel like a victory lap instead of a struggle. Remember, the real prize is celebrating at the beach with the incredible Bike to the Beach community, and you want to have the energy to enjoy it.
The Power of Group Riding and Drafting
One of the best parts of a Bike to the Beach event is the incredible sense of community, and that feeling is a powerful tool on the road. Riding in a group provides a huge mental and physical advantage. The energy from your fellow cyclists is motivating, but the real magic is in drafting. By riding behind another cyclist, you can reduce wind resistance by up to 30%, saving a massive amount of energy over 100 miles. Our organized rides, like the one from New York to Westhampton, are designed with clear routes and full support, so you can focus on pedaling and connecting with your teammates. Let the group pull you along and enjoy the shared effort.
Fueling for the Final Miles
Think of your body as an engine that needs constant fuel to keep running. To avoid “bonking” or hitting the wall, you need to eat and drink consistently throughout the ride—not just when you feel hungry or thirsty. For a long ride, a great strategy is to start taking in calories after the first hour and aim for 75-90 grams of carbs each hour after that. Begin with solid foods like bananas or small sandwiches, which are easier on your stomach early on. Save the sugary gels and chews for the final third of the ride when you need a quick energy spike. This approach prevents flavor fatigue and keeps your energy levels stable for all 100 miles.
Group Riding Etiquette and Safety
Riding in a large group is an amazing experience, but it comes with a shared responsibility for safety. At Bike to the Beach, we are a community first, and that means looking out for one another on the road. Good group riding etiquette is all about being predictable, communicative, and aware of your surroundings. When everyone follows a few simple rules, the entire group can move more smoothly and safely, allowing you to focus on the ride and the beautiful scenery. Mastering these skills will not only make you a better cyclist but also a valued teammate that others are happy to ride with.
Think of group riding as a team sport where communication is key. Every rider contributes to the safety and efficiency of the pack. Simple actions like pointing out a pothole or holding a steady line can prevent accidents and keep the group’s momentum going. Before ride day, it’s a great idea to get comfortable with these dynamics so they feel like second nature. This section will cover the essential etiquette and safety practices that will help you ride with confidence and be a positive force within the group, ensuring a fantastic experience for you and everyone around you.
Practice Riding with a Group Beforehand
If you’re new to group cycling, it’s a great idea to get some practice in before the main event. Join a local club ride or gather a few friends to simulate the experience. This is the perfect opportunity to get comfortable riding close to others and to practice the communication skills you’ll need on event day. A long training ride is also the ideal time to do a final check on your bike fit and test your nutrition and hydration plan. Knowing that your gear is dialed in and your fueling strategy works will give you a huge confidence boost, letting you relax and enjoy the community atmosphere of the ride.
Staying Aware in Crowded Conditions
When you’re riding in a pack, your awareness needs to extend beyond your front wheel. Always be scanning the road ahead, looking several riders deep to anticipate changes in speed or direction. Avoid staring at the wheel directly in front of you, as this limits your reaction time. Your goal is to be predictable. Ride in a straight line, avoid sudden braking or swerving, and maintain a steady pace. By being a smooth and predictable rider, you contribute to the safety of the entire group. Remember, everyone is a teammate, and staying aware is how you look out for each other.
Communicating Obstacles to Other Riders
Clear communication is the bedrock of safe group riding. Since the riders behind you can’t see what’s coming, it’s your job to pass information back through the pack. Use verbal cues and hand signals to alert others to road hazards. A simple point down to the left or right can indicate a pothole or debris. A flat hand held out signifies you are slowing down. And don’t be afraid to use your voice—a loud “slowing!” or “car back!” is incredibly effective. Learning a few basic cycling hand signals and calls makes the ride safer and smoother for everyone, reinforcing the supportive, team-first spirit of our community.
Your Final Pre-Ride Checklist
With your rental bike secured and your gear ready, you’re in the home stretch. The final days before your ride are all about tying up loose ends so you can show up to the starting line feeling confident and prepared. A few simple checks can make a huge difference in how your day goes, ensuring you can focus on the ride and the incredible community around you. Think of this as your final to-do list before the big day. It’s not about last-minute cramming; it’s about setting yourself up for a smooth, safe, and unforgettable experience.
Give Your Rental a Final Safety Check
Even if the shop gave your rental a thumbs-up, it’s smart to give it one last look-over yourself. A day or two before the ride, run through a quick ABC check: Air, Brakes, and Chain. Make sure your tires are inflated to the pressure recommended on the tire wall. Squeeze your brake levers to confirm they feel firm and responsive. Finally, check that your chain looks clean and lightly lubricated. This simple pre-ride safety check takes just a few minutes and helps you catch any potential issues before they happen on the road. If anything seems off, you’ll still have time to call the rental shop for a quick fix.
Check Your Tire Pressure with a Floor Pump
Proper tire pressure is one of the most critical factors for a successful century ride, affecting your speed, comfort, and resistance to flats. Don’t just give the tires a squeeze; use a floor pump with a gauge for an accurate reading. Look on the sidewall of the tire for the manufacturer’s recommended pressure range, usually listed in PSI (pounds per square inch). Inflating your tires correctly helps you roll more efficiently and absorbs small bumps in the road, saving you energy over the long haul. Since tires naturally lose a little air over time, it’s a great habit to top them off the morning of the ride to ensure you start with optimal tire pressure.
Take a Quick Test Ride
After you’ve run through the basic ABCs, take your rental for a quick test ride. This is your chance to confirm everything feels solid and ready to go before you’re on the course. A short spin around the hotel parking lot or a quiet side street is all you need. As you pedal, listen for any unusual clicks or squeaks. Run through the gears to make sure they shift smoothly up and down, and give the brakes a few gentle squeezes to feel how they respond. This final inspection is your opportunity to build confidence in your equipment, ensuring that on ride day, your only focus is on the road ahead and the community riding with you.
Don’t Skip the Pre-Ride Test Spin
Once you’ve inspected your bike, take it for a short spin around the block. This isn’t a training ride; it’s a final systems check. Listen for any unusual squeaks or rattles. Shift through all the gears to make sure they’re changing smoothly. Pay attention to how the bike feels. Do the saddle and handlebars feel comfortable and secure? This quick ride helps confirm that all your adjustments are dialed in and gives you a final boost of confidence in your equipment. It’s the perfect way to calm any pre-ride jitters and get excited for the journey ahead.
Finalize Your Route and Safety Plan
Bike to the Beach events are fully supported with clear signage and an amazing team, but it’s always a good idea to familiarize yourself with the route. Take a look at the map our team provides and load the course onto your phone or GPS device if you have one. Knowing what to expect, like major turns or rest stop locations, helps you ride with more confidence. Also, confirm you have the contact information for our on-site support team saved in your phone. While we’ll be there to help every step of the way, being prepared helps everyone have a safer ride. It’s all part of our commitment to creating a supportive experience for every single rider in our Bike to the Beach community.
Related Articles
- How to Train for Your First 50 Mile Bike Ride
- 8 Steps to Prepare for a 100 Mile Bike Ride
- 50 Mile Bike Ride for Beginners: The Ultimate Guide
Frequently Asked Questions
How far in advance should I book my rental bike for a big event? It’s a great idea to book your rental bike as soon as you register for your ride. For popular events like ours, local bike shops can get booked up quickly, especially on weekends. Calling at least a month or two in advance gives you the best selection of bikes and plenty of time to coordinate with the shop. This way, you can secure the right bike and focus on your training and fundraising.
What’s the single most important thing I can do to make a rental bike comfortable for 100 miles? If you do just one thing, bring your own saddle from home. A comfortable ride starts with a saddle your body is already used to. Saddles are a very personal piece of equipment, and using your own is the best way to prevent soreness over a long distance. Most shops are happy to install it for you; just pack it in your bag and ask when you pick up the bike.
What should I do if I have a mechanical issue with my rental during the ride? First, make sure you ask the rental shop about their policy for on-road issues before you rent. Some may offer roadside assistance. For a Bike to the Beach ride, you’re never alone. We have support vehicles and bike mechanics along the entire route to help with flats or other mechanical problems. Just pull over safely and use the support number we provide to all riders.
I’m new to long-distance cycling. Should I rent a road bike or a hybrid? This really comes down to your personal preference for comfort versus speed. A road bike will be lighter and more efficient, helping you cover the distance with less effort. A hybrid bike, with its upright position and wider tires, will offer a more comfortable and stable ride. If you prioritize comfort and enjoying the scenery, a hybrid is a fantastic choice. If you feel confident and want more performance, go for an endurance road bike.
Do I need to purchase extra insurance for my rental bike? Most shops will hold a security deposit on your credit card, but it’s smart to ask if they offer a damage waiver. This is a small, optional fee that can cover you in case of accidental damage to the bike. It’s not required, but it can provide great peace of mind, letting you focus on your ride without worrying about potential repair costs for things like a scraped frame or a bent wheel.