How to Conquer Your First 100 Mile Bike Ride
Get ready for your first 100 mile bike ride with a clear training plan, nutrition tips, and practical advice to help you finish strong and enjoy the journey.
That moment of excitement after signing up for a century ride? It’s often followed by a wave of, “What have I gotten myself into?” If you’re feeling a mix of thrilled and terrified about your first 100 mile bike ride, you’re not alone—and you are absolutely capable of doing this. This guide replaces that uncertainty with a clear, actionable plan to build your confidence week by week. We’ll show you exactly how to train, what to eat, and how to prepare so you can arrive at the starting line feeling strong, prepared, and genuinely excited for the adventure ahead.
Key Takeaways
- Build endurance with a balanced plan: A successful century comes from a consistent schedule of three weekly rides and prioritizing recovery. Your body gets stronger during rest, so scheduled days off and a pre-ride taper are just as important as your time on the bike.
- Dial in your fuel and gear during training: Use your long rides as a dress rehearsal. Test your nutrition and hydration strategy to find what works for you, and get a professional bike fit early on to ensure your setup is comfortable for the long haul.
- Manage your energy with smart pacing and mental focus: On ride day, resist the urge to start too fast and settle into a comfortable, conversational pace. Mentally, break the ride into smaller segments, focusing only on reaching the next rest stop to stay positive and avoid feeling overwhelmed.
What Is a Century Bike Ride?
So, what exactly is a century ride? At its core, it’s a long-distance bike ride that marks a significant milestone for cyclists. The term “century” refers to the number 100, but whether that means miles or kilometers depends on where you are in the world. These rides are organized events, often sponsored by cycling clubs or charities, that bring people together to tackle an ambitious goal. Unlike a race, the focus is usually on completion and community rather than speed. Think of it as a festival on wheels, where the shared experience of pushing your limits is the real prize. It’s a day to celebrate fitness, determination, and the simple joy of a long ride with friends, old and new.
Imperial vs. Metric Century and Other Distances
The term “century” can be a bit confusing because it means different things depending on the measurement system used. Most organized events, especially charity rides, understand that not everyone is ready for the full 100-mile challenge. That’s why they typically offer several distance options, creating an inclusive atmosphere where cyclists of all levels can participate and contribute to a great cause. This flexibility allows you to choose a goal that feels right for you, whether you’re a seasoned rider or just starting your cycling journey. Let’s break down the most common distances you’ll see.
The Imperial Century: 100 Miles
In the United States, a century ride almost always refers to a 100-mile ride. This is the classic endurance challenge that many cyclists aspire to complete. Covering 100 miles (about 161 kilometers) on a bike is a serious physical and mental accomplishment, often compared to running a marathon. It requires dedicated training, a solid nutrition plan, and a lot of grit. Many of our Bike to the Beach charity rides feature a 100-mile option, giving you a powerful goal to work toward while you fundraise for autism and disABILITY awareness.
The Metric Century: 100 Kilometers
The metric century is a 100-kilometer ride, which equals about 62 miles. It’s a popular and highly respected distance that serves as a perfect stepping stone toward a full imperial century. For many riders, completing a metric century is their primary goal for the season. It’s a fantastic way to experience the energy and camaraderie of a large-scale event without committing to the longer 100-mile distance. Our New England ride, for example, offers both 100-mile and 100-kilometer routes to welcome more people into our community.
Other Common Distances: Half and Quarter Century
To make events even more accessible, many organizers also include half-century (50 miles or kilometers) and quarter-century (25 miles or kilometers) options. These shorter distances are perfect for new riders, families, or anyone looking for a fun, active day without the intense training required for a full century. They provide a taste of the event-day excitement and allow everyone to be part of the finish-line celebration. It’s all about participation and supporting a shared mission, no matter how many miles you ride.
The Marathon on Wheels: Framing the Challenge
Completing a 100-mile ride is often called the “marathon on wheels,” and for good reason. It’s a monumental test of endurance that pushes your body and mind. Just like you wouldn’t show up to run 26.2 miles without training, you need to prepare properly for a century. The journey involves building your stamina through consistent riding, learning how to fuel your body for hours on the bike, and developing the mental toughness to keep pedaling when you feel tired. The sense of accomplishment you’ll feel crossing that finish line is incredible, and it’s a feeling you’ll carry with you long after the ride is over.
How Long Does It Take to Ride 100 Miles?
The time it takes to finish a 100-mile ride varies widely, but you can generally expect to spend at least five to six hours in the saddle, and often more. Your final time will depend on several factors, including your personal fitness level, the course terrain (are there a lot of hills?), weather conditions like wind and heat, and how long you spend at rest stops. A comfortable, steady pace for a beginner might be around 15-16 mph on flat ground, while more experienced riders might average 18-20 mph or more. The key is to find a sustainable pace that works for you.
How a Century Ride Differs From Other Events
The world of cycling is full of different types of events, and it’s helpful to know how a century ride fits in. While they all involve riding a bike, the format, goals, and overall vibe can be quite different. A traditional century, especially a charity ride like those we host in DC and New York, is typically a non-competitive, community-focused event where the main objective is to finish the distance. It’s more about personal achievement and shared experience than racing against the clock. Here’s a quick look at how it compares to a couple of other popular long-distance ride formats.
Gran Fondo
A Gran Fondo, which translates to “big ride” in Italian, is a mass-participation cycling event that originated in Europe. Like a century, it attracts a wide range of riders, but Gran Fondos are often timed, with results posted for different age groups. While not a professional race, they have a more competitive element, and the routes are not always set at 100 miles. They can be shorter or longer, and they often feature challenging climbs and scenic courses. Think of it as a hybrid between a casual ride and a full-blown race.
Randonneuring
Randonneuring is a non-competitive, long-distance cycling sport where riders must complete a specific course within a set time limit, passing through checkpoints along the way. These events, called “brevets,” emphasize self-sufficiency. Riders are expected to carry their own supplies or purchase them en route, as support is minimal. The focus is purely on endurance and navigation, making it a very different challenge from a fully supported charity ride where rest stops with food, water, and mechanical help are provided every 15-20 miles.
What Makes a Century Ride Such a Big Challenge?
A 100-mile bike ride, or a “century,” is a classic milestone in cycling for a reason. It’s a true test of endurance that pushes you to find your physical and mental limits. But here’s the secret: it’s an achievable goal for almost any rider who is willing to prepare. Completing a century isn’t about being the fastest or strongest person on the road; it’s about commitment, strategy, and the incredible feeling of accomplishing something you worked hard for.
The challenge is twofold. First, you have to prepare your body to handle hours in the saddle. This involves building stamina and learning how to fuel yourself correctly. Second, you have to train your mind to stay positive and focused, especially when your legs start to feel heavy. The beauty of a ride like this is that the journey to the starting line is just as important as the ride itself. Every training session builds your confidence and resilience, preparing you for the incredible experience of ride day.
What a 100-Mile Ride Asks of Your Body
Let’s be direct: riding 100 miles is a huge physical undertaking. Your training needs to focus on building two key things: aerobic fitness and muscular endurance. Aerobic fitness is how efficiently your body uses oxygen to power your muscles, while muscular endurance is your muscles’ ability to resist fatigue over a long period. Both are essential for pedaling for hours on end. Even for seasoned cyclists, the final 20 miles of a century are famously difficult. This is where your training really pays off, helping you push through when your body is telling you to stop. Preparing for a ride like our New England century means conditioning your body to go the distance, so you can finish strong.
Mastering the Mental Game of a Century Ride
Your mindset is just as important as your physical conditioning—if not more so. Many riders find that the mental challenge is the biggest hurdle, but they also discover an inner strength they didn’t know they had. The key is to break the ride down into smaller, manageable segments instead of fixating on the full 100 miles. Finishing a century is a massive achievement, no matter how long it takes. Pushing through the tough moments teaches you about your own resilience. When you connect that personal effort to a greater purpose, it makes every pedal stroke more meaningful. Remembering why we bike can provide powerful motivation when you need it most.
How Long Should You Train for a Century Ride?
So, how much time do you really need to get ready for a 100-mile ride? The good news is, it’s probably less than you think. While every rider starts from a different place, there’s a general timeline that works for most people preparing for their first century. Whether you’re a regular on your bike or just dusting it off, a structured plan can get you across that finish line. The goal isn’t to become a pro cyclist overnight, but to consistently build your strength and endurance so you can feel confident and have fun on ride day—which is what our Bike to the Beach rides are all about.
Think of your training as a steady journey, not a sprint. This approach helps prevent burnout and injury, ensuring you arrive at the starting line feeling prepared and excited. The right amount of time allows your body to adapt to longer distances and gives you the mental space to learn about pacing, nutrition, and hydration. It’s about creating a solid foundation that will carry you through all 100 miles. Let’s break down what that timeline looks like and how to build the fitness base you’ll need for success.
Your 8 to 12-Week Century Training Timeline
For most people, an 8 to 12-week training window is the sweet spot. If you already have a bit of a fitness base, 8 to 10 weeks is often a good amount of time to prepare. This gives you enough time to gradually increase your mileage without feeling rushed. If you’re newer to cycling or just want a more relaxed build-up, aim for a 12-week plan. This extra time helps build confidence and allows for more flexibility if life gets in the way. The most important thing is to choose a timeline that feels challenging but achievable for you.
Gauging Your Readiness: Training Rules of Thumb
Knowing if you’re “ready” isn’t about hitting a certain speed; it’s about building the confidence and endurance to go the distance. A great rule of thumb is to complete a 60- to 70-mile ride two or three weeks before your century. If you can comfortably finish that distance, you can absolutely handle 100 miles on event day with the support and energy of the crowd. To get there, focus on consistency over intensity. A schedule of three rides per week—two shorter mid-week rides and one long weekend ride—is a proven formula. Use your long rides to practice fueling, which is just as important as pedaling. Try to eat a small snack every 45-50 minutes and sip water every 15-20 minutes to keep your energy stable. This preparation ensures you’re ready for the physical and logistical demands of a ride like our Washington, D.C. century.
First Things First: Build Your Fitness Base
Before you start adding major miles, you need a solid fitness base. This just means getting your body comfortable with spending consistent time on the bike. A great way to do this is by committing to three rides per week: two shorter rides during the week and one longer ride on the weekend. The weekday rides maintain your fitness, while the weekend ride is where you’ll build your endurance. Focus on longer, slower rides where you can hold a conversation. This “Zone 2” effort is the secret to building the stamina you’ll need to keep pedaling for 100 miles.
How to Structure Your Century Training Plan
A great training plan isn’t about pushing yourself to the limit every day. It’s about consistency, smart progression, and listening to your body. The goal is to arrive at the starting line of your Bike to the Beach ride feeling strong, confident, and ready for an incredible day. The best way to do that is with a clear, manageable structure that builds your endurance without leading to burnout. Think of it as a roadmap for your training journey.
A well-rounded plan focuses on three key elements: how often you ride, the types of rides you do, and how you gradually increase your distance. By balancing these components, you’ll build the stamina needed to pedal 100 miles and enjoy the experience from start to finish. This approach will prepare you for any of our scenic routes, whether you’re joining the ride to the Hamptons or another one of our destination events. Let’s break down what that looks like week by week.
The Magic Number: Three Rides a Week
Consistency is your best friend when training for a century. The most effective and sustainable schedule for most people is three rides per week. Plan for two shorter rides during the week and one long ride on the weekend. The best way to stick with it is to put these rides on your calendar just like any other important appointment.
This schedule works because it gives your body a perfect balance of stress and recovery. The shorter weekday rides help maintain your fitness and keep your legs feeling fresh, while the weekend ride is dedicated to building the endurance you’ll need on event day. This rhythm helps you make steady progress without overtraining, ensuring you stay motivated and injury-free.
The Perfect Mix: Long, Zone 2, and Recovery Rides
Not all rides are created equal, and variety is key to building a strong foundation. Your long weekend ride should be your main focus. This is where you’ll build endurance by riding at a steady, comfortable pace. We call this “Zone 2” training, which is simply a level of effort where you can easily hold a conversation. It’s not about speed; it’s about spending time in the saddle.
Your two shorter weekday rides can serve different purposes. One could be a recovery ride—a very easy spin to loosen up your muscles. The other could be a tempo ride where you pick up the pace a bit. Mixing in different efforts helps your body adapt and become a more efficient and resilient cyclist. Remember, the long, slow rides are what will truly prepare you for 100 miles.
Adding Interval Training for Strength and Speed
While long, steady rides are essential for endurance, adding short bursts of speed is your secret weapon for building strength. This is called interval training, and it’s much simpler than it sounds. All it means is mixing brief periods of hard effort—like sprinting for 30 seconds or pushing hard up a hill—with periods of easy recovery. These intense workouts are incredibly effective for building power and improving how efficiently your body uses oxygen. Just one interval session a week can make your comfortable cruising pace feel faster and those hills a little less daunting. It’s a fantastic way to quickly improve your fitness and feel stronger from start to finish on your long rides.
Slow and Steady: Build Your Distance Gradually
The golden rule of endurance training is to increase your distance slowly. Start with a long ride distance that feels challenging but manageable for you, and aim to add about 5 to 10 miles to it each week. This gradual progression gives your body time to adapt, which is the safest and most effective way to build stamina and prevent injuries.
You don’t need to ride a full 100 miles before the event. Plan for your longest training ride to be around 80-85 miles a couple of weeks before the big day. On event day, the excitement, adrenaline, and support from the community will help carry you through those final miles. This steady, patient approach is what builds the physical and mental strength you need, reminding you of why we bike in the first place.
How to Fuel Your Body for 100 Miles
Your training plan gets your muscles ready, but your nutrition plan is what gets you across the finish line. Fueling for a century ride isn’t just about what you eat on the day of the event—it’s a strategy that starts days before and continues with every pedal stroke. Think of your body as a high-performance engine; it needs the right type and amount of fuel at the right time to run efficiently for 100 miles. Getting your nutrition right prevents the dreaded “bonk,” where your body runs out of energy, and keeps your spirits high. It’s a crucial piece of the puzzle that turns a challenging ride into an incredible accomplishment. At our Bike to the Beach rides, we have fully stocked rest stops to support you, but knowing your personal fueling strategy is the key to a great day on the bike.
The 4,000 Calorie Challenge: Why Fueling Matters
Riding 100 miles can burn upwards of 4,000 calories, which is a massive energy demand. To put that in perspective, your body simply can’t store enough fuel to get you through the ride without consistent refueling. The most important rule of century ride nutrition is to eat and drink before you feel hungry or thirsty. By the time your body sends those signals, you’re already running low. A great way to stay on track is to set a timer on your bike computer or watch to remind you to take a sip of water and a small bite of food every 20 to 30 minutes. This consistent intake is your secret weapon against hitting the wall—or “bonking”—and it ensures you have the energy to pedal strong all the way to the finish line.
Your Pre-Ride Carb-Loading Strategy
A couple of days before your ride, your main job is to stock your muscles with glycogen, which is your body’s primary fuel source. This is done through carb-loading. This doesn’t mean you need to eat mountains of pasta for every meal, but you should focus on making carbohydrates the star of your plate. Aim to increase your carb intake in the 48 hours leading up to the ride. Simple, easy-to-digest carbs are your best friends here. Think rice, potatoes, and bagels. This process ensures your energy stores are completely full when you line up at the start, giving you the maximum amount of fuel to burn through on your journey to the beach.
How to Eat and Drink on the Bike
Once you start pedaling, the clock starts on refueling. Your pre-ride breakfast will only get you so far, so it’s essential to start eating early and often. A good rule of thumb is to consume 60-90 grams of carbohydrates every hour after the first hour. Waiting until you feel hungry is too late, as your energy levels will already be dropping. This is where easily digestible snacks come in handy. Things like energy gels, chews, or a banana are perfect for getting quick fuel to your muscles. Consistent eating keeps your energy steady, prevents fatigue, and makes the ride much more enjoyable. It’s a simple habit that makes a world of difference over 100 miles.
A Simple Schedule: When to Eat and Drink
To keep things simple, set a timer on your bike computer or watch to go off every 45-60 minutes. When it beeps, it’s your reminder to eat and drink. Start sipping from your water bottle within the first 15 minutes of the ride and continue consistently. After about an hour, have your first snack—maybe a gel, a few energy chews, or half an energy bar. From then on, stick to that hourly schedule. This proactive approach is your best defense against hitting the wall. At our Bike to the Beach rides, our rest stops are strategically placed and stocked with everything you need, making it easy to grab fuel and keep moving. The key is to treat fueling like part of your pacing strategy: small, consistent efforts add up to a strong finish.
Water Isn’t Enough: Why You Need Electrolytes
Hydration is just as important as food. Dehydration can quickly lead to cramps, fatigue, and a serious drop in performance. Plan to drink consistently throughout your ride, aiming for about one water bottle per hour, depending on the heat and your effort level. Just sipping water isn’t enough, though. When you sweat, you lose vital salts called electrolytes, which need to be replaced. After the first hour, start incorporating a sports drink or add an electrolyte tablet to your water bottle. This helps your body absorb the water you’re drinking and keeps your muscles functioning properly.
Your Go-To Snacks for a 100-Mile Ride
While energy gels and chews are great, you’ll likely want some real food, too. To avoid flavor fatigue from too many sweet snacks, start with solid, more savory foods in the first few hours. A small peanut butter and jelly sandwich, a banana, or a granola bar can be great options. As the ride goes on and your body gets more tired, you may find it easier to digest simpler fuels like gels and chews. The key is to pack things you’ve already tried during your training rides. Ride day is not the time to experiment with a new energy bar that might upset your stomach. Find what works for you and have it ready to go.
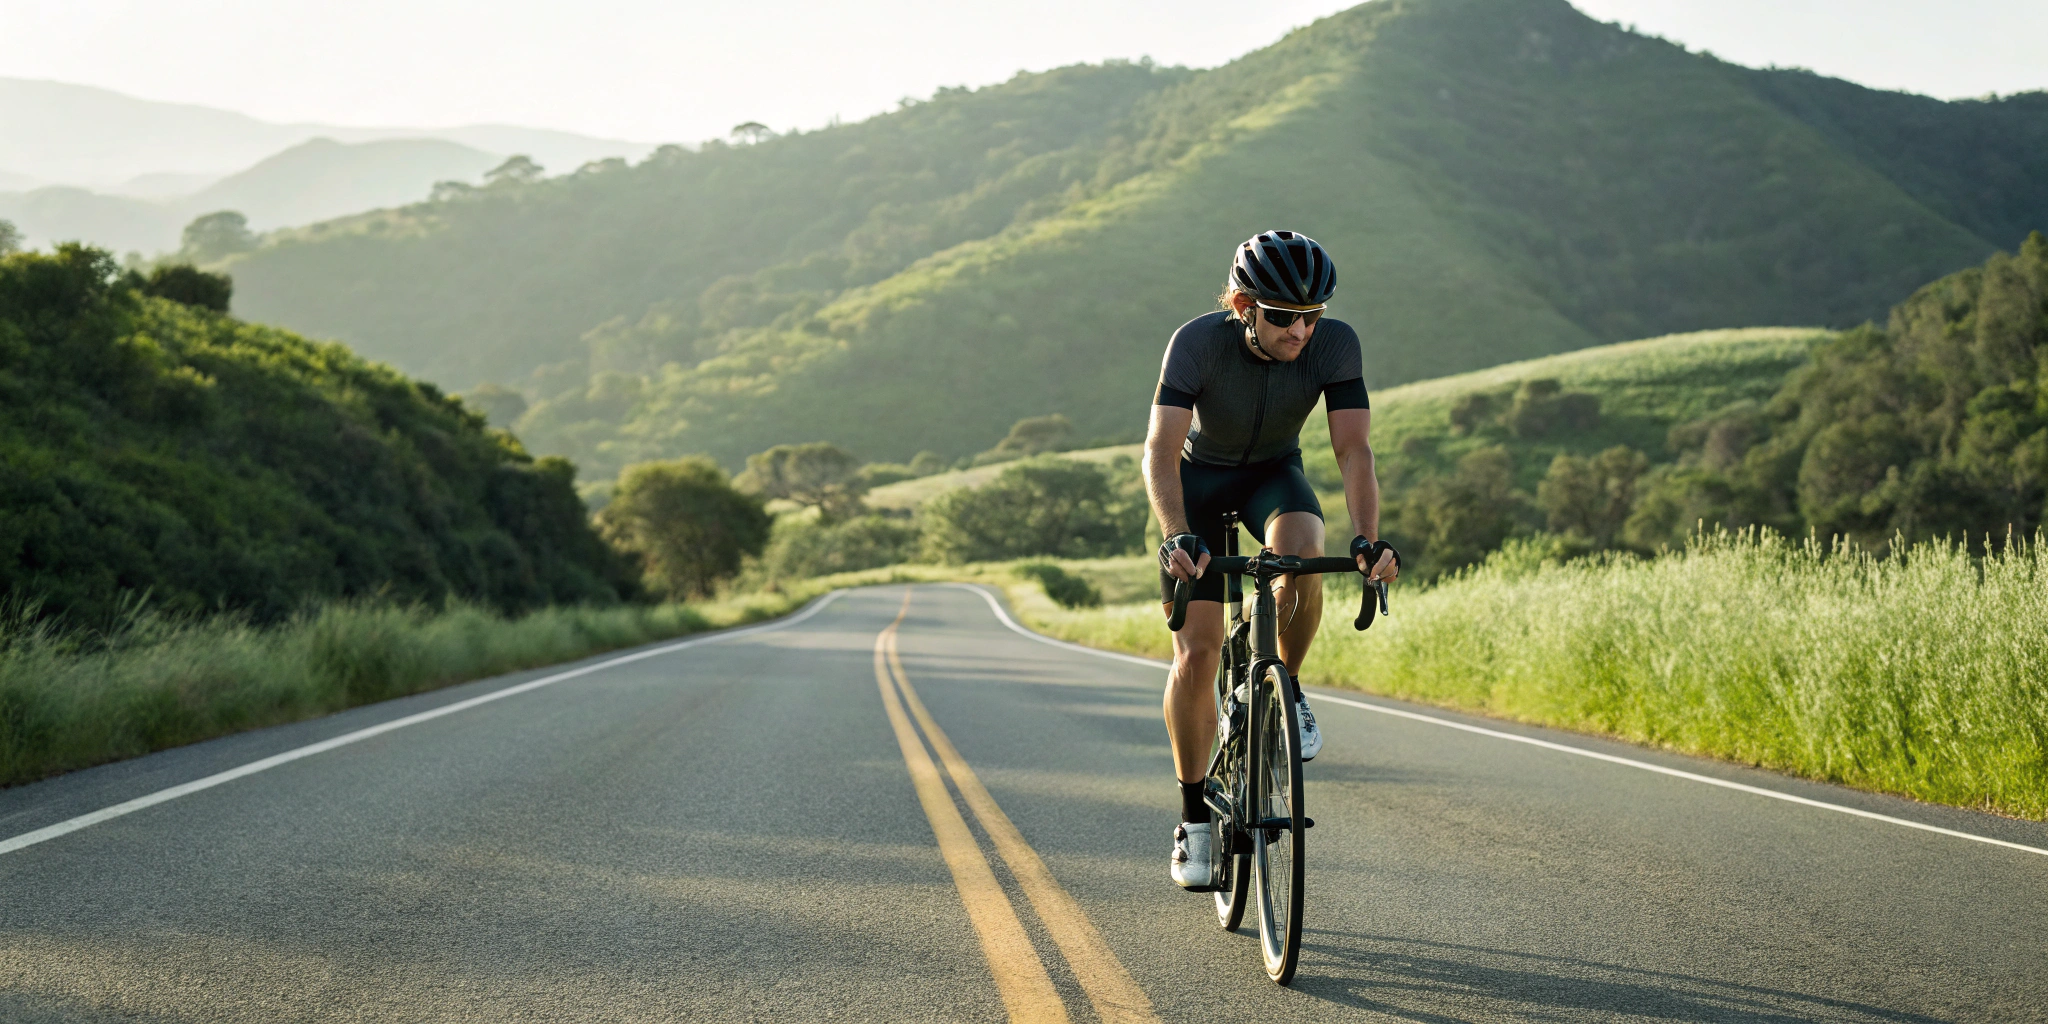
How to Set Up Your Bike for a Comfortable Ride
Your relationship with your bike over 100 miles is going to be a long one, so you want to make sure you’re on good terms. What feels like a minor annoyance on a 20-mile ride can become a major source of pain by mile 70. Setting up your bike for comfort isn’t about luxury—it’s about injury prevention and making sure you can finish the ride feeling strong. A few key adjustments can make all the difference between a day of nagging pain and a ride you’ll remember for all the right reasons. Before you start logging serious miles, take the time to dial in your bike’s fit and gear. Your body will thank you for it.
What Kind of Bike Do You Need for a Century?
You might be picturing sleek, carbon-fiber race bikes, but the truth is, you don’t need a pro-level setup to ride 100 miles. The most important factor isn’t the brand or the price tag—it’s how comfortable you are on the bike you have. Almost any bike can be used for a century as long as it fits you well and is in good working order. Whether it’s a road bike, a hybrid, or a touring bike, what matters is that it allows you to maintain a comfortable riding position for hours.
The single most valuable investment you can make isn’t in a new bike, but in a professional bike fit. A bike fitter will adjust your saddle height, handlebar position, and other key components to match your body’s unique geometry. This simple step can prevent common pains in your back, neck, and knees, making your training and the final 100-mile ride a much more positive experience. Getting your bike dialed in early ensures you can focus on building endurance, not fighting discomfort.
Invest in Comfort: Get a Pro Bike Fit
If you do one thing to prepare your bike for a century, make it this. A professional bike fit at a local shop is the best investment you can make in your training. A fitter will adjust your bike’s components to match your body’s specific mechanics, optimizing everything from your saddle height to your handlebar position. This process helps you find a posture that is both powerful and sustainable for long distances. Small discomforts in your feet, hands, shoulders, or neck on short rides are warning signs of bigger problems on a long one. A proper fit addresses these issues head-on, reducing your risk of repetitive stress injuries and ensuring your comfort from the first mile to the last.
How to Choose the Right Saddle for a Long Ride
Finding the right bike saddle is a very personal journey, but it’s one of the most important parts of preparing for a century. It might seem counterintuitive, but a super soft, cushy seat is often not your friend on a long ride. Softer saddles can cause more chafing and create pressure points over many hours. A firmer saddle that supports your sit bones correctly is usually a better choice for endurance cycling. Don’t be afraid to try a few different options to see what works for you. Remember, the right saddle combined with a good pair of padded bike shorts is the ultimate combination for a comfortable ride.
Gear Up: Your Essential Century Ride Checklist
Being prepared for common mechanical issues will give you the confidence to handle anything the road throws at you. Pack a small saddlebag with the essentials so you’re self-sufficient between aid stations. Your kit should include a multitool, a spare tube, a small pump or CO2 inflator, and tire levers. Beyond tools, always carry your helmet, sunglasses, and enough food and water to get you through each leg of the ride. About a week before the event, give your bike a thorough check-up or take it to a shop for a tune-up. This gives you plenty of time to fix any issues before you head to the starting line for your Bike to the Beach ride.
Don’t Forget These Gear Essentials
Beyond the repair kit, a few key pieces of apparel and safety gear will make your ride infinitely more comfortable and secure. Think of these as non-negotiables for a long day on the bike. They’re the difference-makers that prevent discomfort and keep you focused on the ride ahead.
- Padded Bike Shorts: If you invest in one piece of cycling apparel, make it a quality pair of padded shorts. They are specifically designed to reduce friction and provide cushioning, which is crucial for preventing saddle sores and staying comfortable for hours.
- Cycling Jersey: A good cycling jersey does more than just make you look the part. The moisture-wicking fabric pulls sweat away from your skin, and the back pockets are perfect for stashing snacks, your phone, and an ID for easy access.
- Cycling Gloves: Padded gloves absorb vibrations from the road, which helps prevent your hands and wrists from going numb. They also offer a better grip on the handlebars and protect your palms in case of a fall.
- Lights: Many century rides, like our DC ride, start before sunrise. A bright front and rear light are essential for helping you see the road and ensuring that cars can see you.
How to Pace Yourself for Your First Century
You’ve put in the training hours, and your bike is ready to go. Now, let’s talk about one of the most critical skills for a successful century ride: pacing. Think of it as your energy management strategy for the day. It’s not about being the fastest rider on the course; it’s about being the smartest. A good pacing plan ensures you have the stamina to pedal strong all the way to the finish line, feeling accomplished and ready to celebrate. It’s the key to turning a grueling challenge into an incredible, memorable experience.
Why You Should Start Slower Than You Think
The morning of the ride, you’ll be buzzing with excitement and adrenaline. It’s so easy to get swept up in the energy and start pedaling way too fast. Resist that temptation. The single best piece of advice for a first-time century rider is to start slow. Going too hard in the first 20 or 30 miles is the quickest way to burn through your energy reserves, leaving you exhausted later in the day. Remember, this is an endurance event, not a sprint. Settle into a comfortable, controlled rhythm from the very beginning. This conservative start will pay off big time in the final miles, allowing you to finish strong instead of just struggling to hang on.
What is Zone 2 and Why Should You Stay There?
The secret to riding for 100 miles is finding a sustainable effort level you can hold for hours. In cycling, this is often called your “Zone 2” effort. You don’t need a heart rate monitor to find it; just pay attention to your body. Zone 2 is a comfortable, conversational pace where you can easily chat with the person riding next to you without gasping for breath. This is the zone where your body efficiently burns fat for fuel and builds serious endurance. During your training, get familiar with what this feels like. On ride day, make this your default pace. It’s the perfect rhythm for enjoying the scenery, connecting with fellow riders, and remembering why we bike in the first place.
Using Pacing Metrics: RPE and FTP
If you’re a numbers person, you might want a more specific way to measure your effort than just a “conversational pace.” A simple and effective tool is the Rate of Perceived Exertion, or RPE. Think of it as a scale from 1 to 10, where 1 is sitting on the couch and 10 is an all-out sprint. For a century ride, you want to aim for an RPE of 6 or 7. This is a challenging but sustainable effort that you can hold for a long time. For riders with a power meter, you can use a metric called Functional Threshold Power (FTP). This is the maximum power you can sustain for about an hour. A great pacing strategy is to keep your effort around 70-75% of your FTP. Both of these metrics are just tools to help you stay in that perfect endurance zone.
The Benefits of Riding in a Group
One of the best parts of a supported event like a Bike to the Beach ride is the incredible sense of community, and that camaraderie is also your secret weapon for pacing. Riding with a group, or “paceline,” offers huge advantages. First, it helps you maintain a steady, consistent speed without having to think about it too much. More importantly, it saves a massive amount of energy. By riding behind another cyclist—a technique called drafting—you can reduce wind resistance by up to 30%. That energy savings adds up significantly over 100 miles. Beyond the physical benefits, riding with others is a huge mental lift. The miles fly by when you’re chatting and working together. Try to stick with a group that’s moving at your ideal pace and avoid getting stuck riding alone between groups.
How to Make the Most of Aid Stations
Our Bike to the Beach rides are fully supported, which means you’ll have aid stations stocked with fuel and hydration along the route. These stops are essential, but it’s important to use them strategically. The goal is to be efficient. Refill your bottles, grab a few snacks, use the restroom, and get back on your bike. It’s much harder to get your muscles going again after they’ve cooled down from a long break. While you’re riding, don’t wait until you feel hungry or thirsty to refuel. Plan to eat a small snack and take a few sips from your water bottle every 20-30 minutes. This steady intake of calories and fluids is what will keep your energy levels stable from start to finish.
Training Your Mind for a 100-Mile Ride
Your body can handle a 100-mile ride, but your mind has to be on board, too. The mental game is just as important as your physical training. As you build endurance on the bike, you’re also building mental toughness. But having a few specific strategies in your back pocket will make all the difference when you hit a tough patch on the road.
Getting your headspace right is about breaking the challenge down, focusing on your motivation, and knowing how to handle the inevitable moments of doubt. It’s about turning “I can’t” into “I’m doing it.” Let’s get into how you can prepare your mind to go the distance.
How to Tackle 100 Miles in Manageable Chunks
Staring down a 100-mile ride can feel overwhelming. The secret is to not focus on the full distance. Instead, break it into small, manageable chunks. Your goal isn’t to ride 100 miles; it’s to ride to the next rest stop. Our Bike to the Beach rides have fully supported aid stations every 10 to 15 miles, which serve as perfect mini-finish lines.
Focus on reaching that next stop, grabbing a snack, and celebrating a small victory. This approach keeps you present and prevents your mind from getting stuck on how far you still have to go. Before you know it, those small segments will add up, and you’ll be closing in on the final finish line at the beach.
Picture This: Visualizing a Strong Finish
Spend some time before the event picturing yourself completing the ride. Imagine the energy of ride day, the feeling of pedaling alongside fellow cyclists, and the incredible sense of accomplishment as you cross the finish line. Visualization is a powerful tool that helps solidify your commitment and strengthens your motivation when you need it most.
Think about more than just the physical act of finishing. Picture the celebration at the beach and the reason you started this journey in the first place. Connecting with your purpose—the community you’re supporting—makes the entire experience more meaningful. Remembering why we bike can provide a powerful mental push when your legs start to feel tired.
When It Gets Tough: Handling Fatigue and Doubt
Even with perfect training, you’ll likely face a moment when your body feels tired and your mind starts to whisper doubts. This is completely normal, especially in the last 20 miles. This is where your mental preparation truly pays off. Acknowledge the feeling, but don’t let it take over.
Remind yourself that you are stronger than you think. Many first-time century riders report that the ride was less difficult than they had imagined. Your positive outlook can genuinely impact your performance. Have a simple mantra ready, like “one pedal at a time,” or focus on the names of the people you’re riding for. Remember, you’re not out there alone. The Bike to the Beach community is with you every step of the way.
Planning the Logistics for Your Ride
Beyond your training schedule and nutrition strategy, a little logistical planning goes a long way in ensuring a smooth, safe, and enjoyable century ride. Getting the practical details sorted out ahead of time frees you up to focus on pedaling and soaking in the experience on ride day. This is where you think through the course itself, the potential weather, and your personal safety net. It’s about anticipating the variables so you can feel confident and prepared for whatever the day holds.
One of the biggest benefits of joining an organized event like a Bike to the Beach ride is that we handle many of the major logistics for you, from marking the route to providing fully-stocked aid stations and support vehicles. However, taking the time to personally review the plan is still a crucial step. Understanding the route profile, packing the right gear for the weather, and knowing your support options will give you a huge mental advantage. This preparation turns uncertainty into confidence, allowing you to relax and enjoy the journey.
Know Your Route: Elevation, Hills, and Traffic
Before you clip in, take some time to study the route map. A century ride in the U.S. is a 100-mile journey, and knowing what to expect over that distance is key. Pay close attention to the elevation profile. This will show you where the major climbs are located so you can mentally prepare and conserve energy for them. Knowing whether the biggest hills come at mile 20 or mile 80 makes a huge difference in how you pace yourself. Also, get a sense of the roads you’ll be on. Are they quiet country lanes or busier roads with a wide shoulder? Understanding the terrain and traffic conditions helps you stay safe and mentally focused throughout the ride.
Plan for the Weather
The weather is the one variable you can’t control, but you can certainly prepare for it. Start checking the forecast a week before your ride and have a few different gear options ready. Ideally, you’ll get a perfect day with temperatures below 80 degrees, but it’s wise to be ready for anything. The best strategy is to dress in layers. Start your morning with arm warmers, a vest, or a light jacket that you can easily shed and stow in your jersey pockets as the day warms up. Always pack a lightweight, foldable rain jacket if there’s even a small chance of showers. Being able to adapt to changing conditions will keep you comfortable and allow you to perform your best, rain or shine.
Have a Backup Plan (Especially for Solo Rides)
Knowing you have a safety net is crucial for your peace of mind. If you’re tackling a century on your own, make sure you have a solid backup plan. This could mean mapping out a train route home or having a friend or family member on call who can pick you up if you run into mechanical trouble or just can’t finish the ride. This isn’t about planning to fail; it’s about being smart and self-sufficient. This is another area where a supported ride shines. At every Bike to the Beach event, we have support and gear (SAG) vehicles patrolling the course to help with mechanical issues or give you a lift to the next rest stop, ensuring you’re never left stranded.
Consider Your Daylight Hours
A 100-mile ride takes a significant amount of time, so you need to think about your daylight window. Depending on the time of year, you may have more limited sunlight, which is an important safety consideration. Plan your start time to give yourself a generous buffer to finish before dusk. It’s also a good idea to equip your bike with front and rear lights, even if you plan to finish in the afternoon. Unexpected delays can happen, and having lights ensures you’ll remain visible to cars in overcast conditions or if your ride takes longer than expected. A little preparation here goes a long way in keeping you safe on the road.
First Century Ride? Avoid These Common Mistakes
Riding your first century is a massive accomplishment, and a little preparation goes a long way toward making it a positive experience from start to finish. While your training builds your fitness, avoiding a few common rookie mistakes on ride day is just as important. Focusing on these key areas will help you cross the finish line feeling strong, proud, and ready to celebrate with the Bike to the Beach community. These simple adjustments can make the difference between a tough day and an unforgettable ride.
Mistake #1: Neglecting Your Fueling Plan
Think of your body as a car on a long road trip—it needs fuel to keep going. Forgetting to eat and drink consistently is one of the fastest ways to run out of gas, a feeling cyclists call “bonking.” Plan to eat something with 75-90 grams of carbs every hour, even if you don’t feel hungry. The temptation to skip a snack grows as you get closer to the end, but those last few miles are when your body needs the energy most. Set a recurring alarm on your watch or bike computer to remind you to take a sip of water and have a bite to eat every 20-30 minutes. Consistent fueling is your secret weapon for a strong finish.
Mistake #2: Pacing Problems and Energy Burnout
The energy on ride day is contagious, and it’s easy to get swept up in the excitement and start too fast. But a century ride is a marathon, not a sprint. Going too hard in the first 20 miles burns through your energy reserves way too quickly, leaving you with nothing in the tank for the final stretch. The best strategy is to start conservatively, riding at a pace where you can still hold a conversation. This keeps your effort steady and sustainable. Remember why we bike—it’s about the journey, the community, and the cause, not about winning the first hour. A smart, steady pace will ensure you have the energy to enjoy the entire ride and finish with a smile.
Mistake #3: Unchecked Gear and Poor Prep
Nothing adds stress to ride morning like a last-minute mechanical issue or a frantic search for your favorite socks. Give yourself peace of mind by getting organized ahead of time. Take your bike for a professional tune-up about a week before the event to catch any potential problems. The day before your ride, lay out all your gear—your helmet, shoes, cycling kit, and nutrition. Pack your saddlebag with essentials like a spare tube, tire levers, and a multi-tool. Having everything ready to go means you can wake up on ride day focused, calm, and excited for the road ahead. If you need any last-minute gear, check out the official Bike to the Beach shop.
Why Rest and Recovery Are Non-Negotiable
Training for a century ride puts a lot of stress on your body, and that’s a good thing—it’s how you get stronger. But the actual strength-building doesn’t happen while you’re pedaling. It happens when you stop. Rest and recovery are when your muscles repair, adapt, and prepare for the next challenge. Every hard ride creates tiny micro-tears in your muscle fibers, and it’s during rest that your body rebuilds them stronger than before. Pushing yourself day after day without a break interrupts this crucial process and is a fast track to burnout, injury, and mental fatigue. Think of recovery not as time off, but as a critical part of your training plan. It’s what turns all your hard work on the bike into real, sustainable fitness. By giving your body the downtime it needs, you ensure you’ll arrive at the starting line for your Bike to the Beach ride feeling powerful, refreshed, and ready to go the distance. Ignoring rest is like studying for a test all night without sleeping—you might put in the hours, but you won’t be sharp enough to perform when it counts. True progress is a cycle of stress and adaptation, and you can’t have one without the other.
Treat Rest Days Like Training Days
Just like you schedule your long rides, you need to schedule your rest days. Don’t wait until you’re completely exhausted to take a break. Being proactive with rest prevents overtraining and keeps you mentally fresh. A rest day doesn’t have to mean sitting on the couch all day, though. It can be a day for active recovery, like a gentle walk or some light stretching. The key is to listen to your body. If your legs feel heavy, your motivation is low, or you’re just not feeling it, that’s a clear sign you need a break. Honoring those signals is one of the smartest things you can do as a cyclist.
The Art of the Taper: Why You Should Ride Less Before the Event
In the final two weeks leading up to the event, you’ll want to taper your training. This means gradually reducing the length and intensity of your rides. It might feel counterintuitive to ride less right before the big day, but this process is essential for peak performance. Tapering allows your body to fully recover from the accumulated fatigue of your training, repair muscles completely, and top off its energy stores. You won’t lose fitness in these two weeks. Instead, you’ll shed fatigue, arriving at the start line feeling fresh and strong rather than tired from a last-minute push.
Your Post-Ride Recovery Routine
What you do in the first hour after a long ride can make a huge difference in how you feel the next day. Your top priority should be refueling. Aim to get some protein and carbohydrates into your system within 30 to 60 minutes of finishing your ride. This kickstarts the muscle repair process and replenishes your energy. A simple protein shake, chocolate milk, or a small meal will do the trick. Don’t forget to rehydrate with water and electrolytes, and consider some gentle stretching to reduce stiffness. A solid post-ride routine helps you bounce back faster so you’re ready for your next ride.
What to Expect on Ride Day
The big day is finally here! All your training, preparation, and fundraising have led to this moment. It’s completely normal to feel a mix of excitement and nerves, but remember that you’re ready for this. The Bike to the Beach community is with you every pedal of the way, from the starting line to the beach. Our rides are fully supported, meaning we handle the logistics so you can focus on the experience. All you need to do is show up, ride your bike, and soak in the incredible energy of the day. Knowing what’s ahead can help calm any last-minute jitters and ensure you have the best possible experience.
Your Ride-Day Morning Routine
A smooth morning sets the tone for a great ride. The key is to prepare everything the day before so you’re not scrambling at 4 a.m. Lay out your cycling kit, fill your water bottles, and pack your gear bag by noon the day before the ride. This gives you plenty of time to grab any last-minute items. Most importantly, prioritize a good night’s sleep. Even if you’re too excited to doze off right away, getting into bed early helps your body rest. On ride day, wake up with enough time to eat a familiar breakfast, get dressed without rushing, and do one final check of your bike’s tire pressure.
How to Handle Common On-the-Road Issues
Even with perfect training, a 100-mile ride will challenge you—and that’s part of the adventure. The biggest hurdle for most first-timers is nutrition. It’s easy to forget to eat and drink when you’re focused on pedaling, but staying on top of your fuel is critical. Don’t wait until you’re hungry or thirsty to stop. Our aid stations are stocked and timed to help you stay energized. The last 20 miles are often the toughest, both mentally and physically. This is when your training and your “why” kick in. Keep fueling, even when the finish line feels close. Remember why we bike and lean on the energy of the riders around you to power through.
What Is a Sag Wagon?
You’ll often hear the term “sag wagon” in the world of organized rides, and it’s one of the best support systems you can have. The name is an acronym for “Support And Gear,” and that’s exactly what it provides. This vehicle follows the route to offer a helping hand wherever it’s needed. Its main job is to carry supplies and provide assistance to riders who might have a mechanical issue, need extra water, or are feeling too fatigued to continue. Think of the sag wagon as your safety net on wheels—it’s there to give you a lift to the next rest stop or even to the finish line if needed. This kind of on-road support is what makes a fully supported ride so reassuring, especially for first-timers. It lets you push your limits with confidence, knowing that you have a backup plan ready and waiting.
You Did It! How to Celebrate and Recover
Crossing the finish line after 100 miles is an unforgettable feeling. Take a moment to celebrate this massive accomplishment! You’ll be greeted by cheers, music, and a community of supporters who are thrilled to see you. Once you’ve soaked it all in, turn your attention to recovery. Your body has done something amazing, and it needs to refuel. Grab a recovery drink or snack and start rehydrating. Within an hour, begin replenishing electrolytes to help your muscles recover. Every challenge you overcame on the road has made you a stronger, more resilient cyclist. Enjoy the finish-line festivities at one of our beautiful beach destinations—you’ve earned it.
Related Articles
- Why We Bike: Building a Sensory Gym with Celebrate the Children
- Register-Donate – Bike to the Beach
- About-Us – Bike to the Beach
CONTACT US
Frequently Asked Questions
Do I really need to ride a full 100 miles in training before the event? No, and you probably shouldn’t. Your longest training ride should top out around 80-85 miles about two weeks before the event. This builds the endurance you need without completely exhausting you right before the big day. On ride day, the incredible energy from the crowd, the support from fellow riders, and the well-stocked aid stations will provide the extra physical and mental push to carry you through those final miles to the beach.
What if I’m not a ‘serious’ cyclist? Can I still do this? Absolutely. This ride is designed for everyone, from seasoned cyclists to people who are new to the sport. The key isn’t your starting fitness level, but your commitment to a consistent training plan. The goal is to challenge yourself and support an amazing cause, not to be the fastest person on the course. Our community is built on encouragement, and you’ll find riders of all speeds and experience levels out there with you.
What happens if I get a flat tire or feel like I can’t finish? This is a common worry, and we’ve got you covered. Our rides are fully supported, which means we have mechanical support at rest stops and support vehicles (we call them SAG vans) patrolling the course. If you get a flat you can’t fix or simply feel like you’ve hit your limit, our team will be there to help you out or give you a lift to the next rest stop or the finish line. Your safety and well-being are the top priority.
I’m worried about the last 20 miles. What’s the secret to getting through them? The final stretch is famously tough, but you can prepare for it. The secret is a three-part strategy you build during your training. First, pace yourself conservatively from the very beginning so you don’t burn out early. Second, stay on top of your nutrition and hydration all day, especially in the second half of the ride. Third, lean on your mental game. Break the remaining distance down from one rest stop to the next and remind yourself why you started this journey.
Is it more important to focus on speed or just finishing the distance? Finishing the distance is the goal, hands down. A century ride is an endurance event, not a race. The smartest and most enjoyable way to approach it is by finding a steady, comfortable pace that you can maintain for hours—one where you could hold a conversation. Pushing for speed is the quickest way to burn out. By focusing on a sustainable effort, you’ll have a much better experience and finish the ride feeling strong and accomplished.